
If you want to learn how to propagate plants by root Cuttings, this article is for you. Rooting cuttings as an alternative to seeds is an effective system whose secret can be explained in two words in a nutshell. The first is “Time” and the second is “Strategy”.
Your method of cutting is as important as your cuttings. That is, if the cutting method is correct, you will see your efforts at a high peak of success at the right time of the year.
“Rooting Cuttings of Deciduous Plants”
We know that softwood cuttings are less durable, so home gardeners use hardwood cuttings as a strategy. Deciduous plants have no leaves in winter and fall completely. All other plants have the same condition. But the evergreen plants have leaves. Many of us don’t think of Rhododendrons, Azaleas, and Mountain Laurel plants as evergreens. But the plant that completely loses its leaves is one of the Deciduous Plants.
Rooting cuttings of Deciduous Plants are done in three ways. Two methods are for hardwood cuttings and one for softwood cuttings. I am only discussing here about hardwood cuttings. But to know about softwood cuttings you need to find a good article. Which of the two techniques for hardwood cuttings you use depends on the type of roots the tree has, the soil conditions where the tree is planted, and how the weather will affect the tree next winter.
Everyone experiences both success and failure in the early stages, so only experimentation will determine which approach works best for you. By using each method you will arrange for rooting cuttings. During hardwood cuttings of Deciduous Plants, you must make sure that your rootstock is completely dormant, if not then wait. Start hardwood cuttings if the temperature drops below 32 degrees Fahrenheit for a few hours, which usually happens in mid-November in Northeast Ohio.

Deciduous trees were introduced to the temperate regions of Australia where they are used as ornamental plants in Sydney.

Forsythia are deciduous shrubs

Forsythia in full bloom in European gardens
As the method of softwood cuttings and hardwood cuttings are opposite to each other, in the case of softwood cuttings of deciduous plants, the cutting is done only by cutting the tip from the end of the branch, hardwood cuttings of deciduous plants are not done in that way. Forsythia plants for example grow to about 1–3 m, sometimes they can grow up to six meters. So using the hardwood cuttings method you can grow plants all year round.

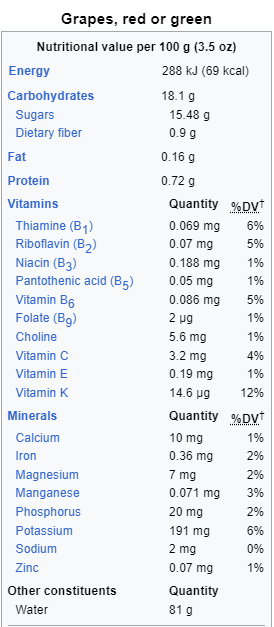
Concord is a variety of North American labrusca grape

Black dark blue and white light green grape
You will get about eight cuttings from one branch. In that case, you select the vine. Grapes are an extremely powerful fruit. This plant has been cultivated since about eight thousand years ago. The earliest known wineries were found in Armenia, around 4000 BC. A grape plant can reach a height of over 10 feet in one season. In that case, you can use the grape plant for hardwood cuttings. Grape vines tend to be a little farther from their stems, so the cuttings will be a little taller than other deciduous plants. Grapevine hardwood cuttings are about a foot in length and contain about three or four dozen of them. For other deciduous plants, the cutting interval is much closer, so the cutting length is 6 to 8 inches.
In the case of hardwood cuttings, the cuttings of a deciduous plant can be easily collected by collecting cuttings from its parents. Do the cuttings of these canes along about six to eight inches. If you look at the canes, you will understand that there are no leaves on these canes, but you will see small scratches along the canes. These bumps are what we call twenty unions which are next year’s leaf twenty.
When cutting hardwood from a deciduous plant, it is best to make the bottom cut or the butt end of the cut just below the node and the top cut about 3/4″ above the node. This technique allows you to separate the top of the cut from the bottom of the cut. And there are two different ways to cut a plant above a node and the part of the stem above that node will go back to the top node. Leave 1/2″ of the stem below the node, but it will go back anyway. So if that part of the dead wood is kept underground it will become a hiding place for insects and diseases.
Roots need some trauma to grow and develop, and a Kalash forms over the wound. The growth of this Kalash is necessary before the roots grow. So cutting at the bottom of the cut just below the node will make the plant grow stronger and rooted.
Above this note 3/4″ cut is made at the top of the cut. So the 3/4″ portion of the stem above the node protects the top note i.e. it protects the handle and buds from damage during planting. If you want you can press on the thorns without damaging the buds.
Thus an angled cut is created at the top of a cut while making a cutting route. This removes water from the cutting edge and helps remove pesticides and pathogens. When all of your cuttings are ready, dip the cuttings in a rooting compound. Make sure you have a strong rootstock for cutting hardwoods or get them from your nursery or garden store. Align them so that the edges of the butt are even then tie them into bundles.
Choose a spot in the garden that gets long periods of sun. Dig a hole one foot deep place all the bundles of cuttings in it and bury the soil. Place the cutting bundles upside down in the hole so that the butt end of the cutting is facing up. And care must be taken that the butt ends of the cuttings are about six inches below the surface of the cuttings. Then cover the cuttings completely with soil and mark the location with a mark so that they can be found later.

Although this works surprisingly well, the truth is that this is how cuttings rooting works. To increase your chances, cover the edges of the cutting butt with moist peat moss before you fill the hole, and make sure you soak the peat moss thoroughly. Then pack it on the edge of the cutter butt.
Some roots will grow from the cuttings over winter. If they are placed upside down in the hole, the butt is closest to the surface, so they are warmed by sunlight. And gets the necessary environment for the growth of the roots.
Inverting stunts top growth so leave them that way until mid-spring when the danger of frost has passed. They will look very tender in winter when the buds develop, but if you dig them up and plant them too soon, cold can do considerable damage. So keep them that way until the danger of frost is over.
Dig the hole in such a way that the cuttings are not damaged. Then open the bundles, hopefully they have developed well. Even if there are no callus, however, you plant them, there is no need to prepare your garden beds when you plant cuttings. Plant only in the garden in sunny conditions with well-drained and rich soil.
To plant the cuttings, make a narrow trench or poke a wedge into the open ground with a spade, placing the cutting in the trench with the butt end down. Place a few buds on top of the soil and fill about half of the cutting with soil. Fill in loose soil around the cuttings so that no air is trapped inside. Then tap them lightly and then water them well.
Give them enough water and make sure that the soil is not wet. Leaves will emerge from the cuttings in a few weeks. Some of these cuttings may collapse due to lack of roots. The rest will grow roots as the leaves emerge. Anyway in the fall, the surviving cuttings should be well-rooted. You can replant them when they go dormant or wait until spring. Waiting until spring ensures you can replant them before breaking dormancy.
There is no scientific method of rooting cuttings. So here is a variation of the above method. This method is still applicable to all hardwood cuttings of deciduous plants. So with this variation, you will do everything exactly the same as you have learned here.
You must not plant the cuttings in the second method mentioned above. Instead, you plant the cuttings as soon as you make them in late fall or any time during the winter when the ground is not cold. In other words, you completely skip the step of planting the cuttings underground for the winter. Following the first method, you plant all the cuttings in the same way and test them with a rooting compound before planting to help root growth.
Hardwood cuttings generally work well with deciduous shrubs. However, they are not likely to work for more refined varieties of deciduous ornamentals like Weeping Cherries or other ornamental trees. Cutting the roots of ornamental trees is possible but only using softwood cutting techniques.
Here we will discuss the root cuttings of evergreen trees using the Hardwood cuttings technique.
In our country, hardwood cuttings of evergreens are usually done at the end of autumn, i.e. in the middle of November when there is heavy snow. I usually get good results by cutting some plants in mid-September when the sun is less warm. When you do these cuttings early, water regularly every day.

Try some cuttings first then if the cuttings are bad then do some more cuttings in November. You can make hardwood cuttings of many evergreens in a simple frame filled with coarse sand at home. To make this frame you need to make a square or rectangular frame using 2″ by 6″ inch boards. Make a large picture frame with nails at the four corners and place the frame above the ground in a location with good drainage and partial shade.
When the frame is complete, remove all the weeds inside and select sand that is coarse. You can use the sand used in swimming pool filters. The sands used in Mason’s work are usually soft, in which case water cannot flow easily through these sands. But you need to select sand that allows water to flow easily through the sand i.e. coarse-grade sand.
Again in the case of sand selection, You can observe by handling the sand that the grain of the sand is coarse, this type of sand will generally be suitable for use in this frame.You choose sand for your frame and place it in a place where water can drain through it. In other words, don’t choose a wet place for your cutting bed.
You can make a cutting clip by cutting 4-5 inches in length from the evergreen root plant. Make only one cutting from each branch, then strip the needles or leaves about half to two-thirds of the way down the cutting. Evergreen cuttings do not need to be heavily damaged because leaves or needles are difficult to remove because of their tough structure and enough damage to root development.
Then dip the butt end of the cuttings into a liquid rooting compound and water them, sticking them in the sand about 3/4″ to 1″ apart until full autumn cool temperatures. Water the cuttings regularly during warm, dry winter days. Remember that raised bedding sand will dry out very quickly but during frosts will not be a problem as the cuttings will be covered with snow, keeping them moist but protecting them from hard frosts. Then start watering again when spring or summer comes they don’t need much water but be careful not to let the sand dry out and also see that the sand is not wet.
For evergreens, the rooting cuttings method works very well but takes a little more time. Leave the frame you created for about a year. If you want you can leave these cuttings until spring and in winter they will actually develop more roots.

By using this cutting method we can increase the variety by cutting some more plants below. These include the diverse Euonymus species, Taxus, Juniper, Arborvitae, Japanese Holly, Boxwood, and English Holly. Do not forget to warm the bottoms of Rhododendrons and Azaleas before cutting their roots.

Rhododendrons and Azaleas plants bottoms warmed